Build Your First Agentforce Agent Using the New Agentforce Builder – Complete Step-by-Step Practical Guide
Author: Khumed Khatib
Salesforce Agentforce AI Agents Salesforce Development
Salesforce is evolving from traditional CRM automation to AI-powered business automation. Earlier, we used Apex Triggers, Salesforce Flow, Process Builder and other automation tools to implement business requirements. Today, Agentforce allows us to build intelligent agents that can understand natural language, make decisions and execute business operations inside Salesforce.
In this tutorial, we are going to build a real-world Agentforce application using the New Agentforce Builder.
We will not just create a chatbot that answers questions. We will create an AI Agent that can understand customer requirements, qualify potential students, create Salesforce Leads and check existing enquiry statuses.
This tutorial covers the complete implementation, starting from Salesforce Setup and ending with Agent activation.
A Lead Management Agent for a Salesforce training company, using an Agent Router, three Subagents, Salesforce Flow and Agent Actions.
1. Understand the New Agentforce Terminology
Before starting the implementation, let's understand the new terminology used in the New Agentforce Builder.
| Previous terminology | New terminology | Purpose |
|---|---|---|
| Topic | Subagent | Handles a specific business responsibility. |
| Topic Selector | Agent Router | Routes requests to the appropriate Subagent. |
| Topic Instructions | Subagent Instructions | Defines the responsibility and behaviour of a Subagent. |
| Actions | Actions | Execute business operations. |
| Agent Builder | New Agentforce Builder | Environment for building and configuring agents. |
The most important concept is that an Agent is the overall AI assistant, while a Subagent handles a particular business task.
How does the architecture work?
2. Project Scenario – Lead Management Agent
Let's consider a practical business scenario.
Imagine we run a Salesforce training institute that offers:
- Salesforce Administrator Training
- Salesforce Development
- Lightning Web Components
- Salesforce Integration
- Agentforce and AI
Every day, we receive enquiries from students who want to join our training programs.
Currently, our team manually collects their information, checks whether a Lead already exists and creates a new Lead record.
We want to automate this process using Agentforce.
Business requirements
| Customer request | Expected Agent behaviour |
|---|---|
| I want to learn Salesforce. | Qualify the customer's learning requirements. |
| I want to register. | Collect customer details and create a Lead. |
| I have already registered. | Search for an existing Lead. |
| Check my enquiry status. | Retrieve the Lead status. |
| What courses do you offer? | Provide course information. |
3. Step 1 – Prepare Your Salesforce Org
First, we need a Salesforce org with Agentforce access.
Requirements
- Salesforce Developer Org or another supported Salesforce edition.
- Agentforce availability and the required agent license.
- Einstein and Agentforce enabled.
- Manage AI Agents permission.
- Permission to create and activate Flows.
- Access to the Lead object.
Navigation: Enable Agentforce
Follow these steps:
- Open your Salesforce Developer Org.
- Click the Gear icon in the top-right corner.
- Select Setup.
- Use the Quick Find search box.
- Search for the relevant Agentforce or Einstein settings.
- Enable the required features if they are not already enabled.
- Verify that your user has the required Agentforce permissions.
4. Step 2 – Open Agentforce Studio
The New Agentforce Builder is accessed through Agentforce Studio.
Detailed steps:
- Click the App Launcher icon in Salesforce Lightning Experience.
- In the search box, type Agentforce Studio.
- Click Agentforce Studio.
- Open the Agents tab or Agents page.
- Review the available agents.
- Click the New Agent button.
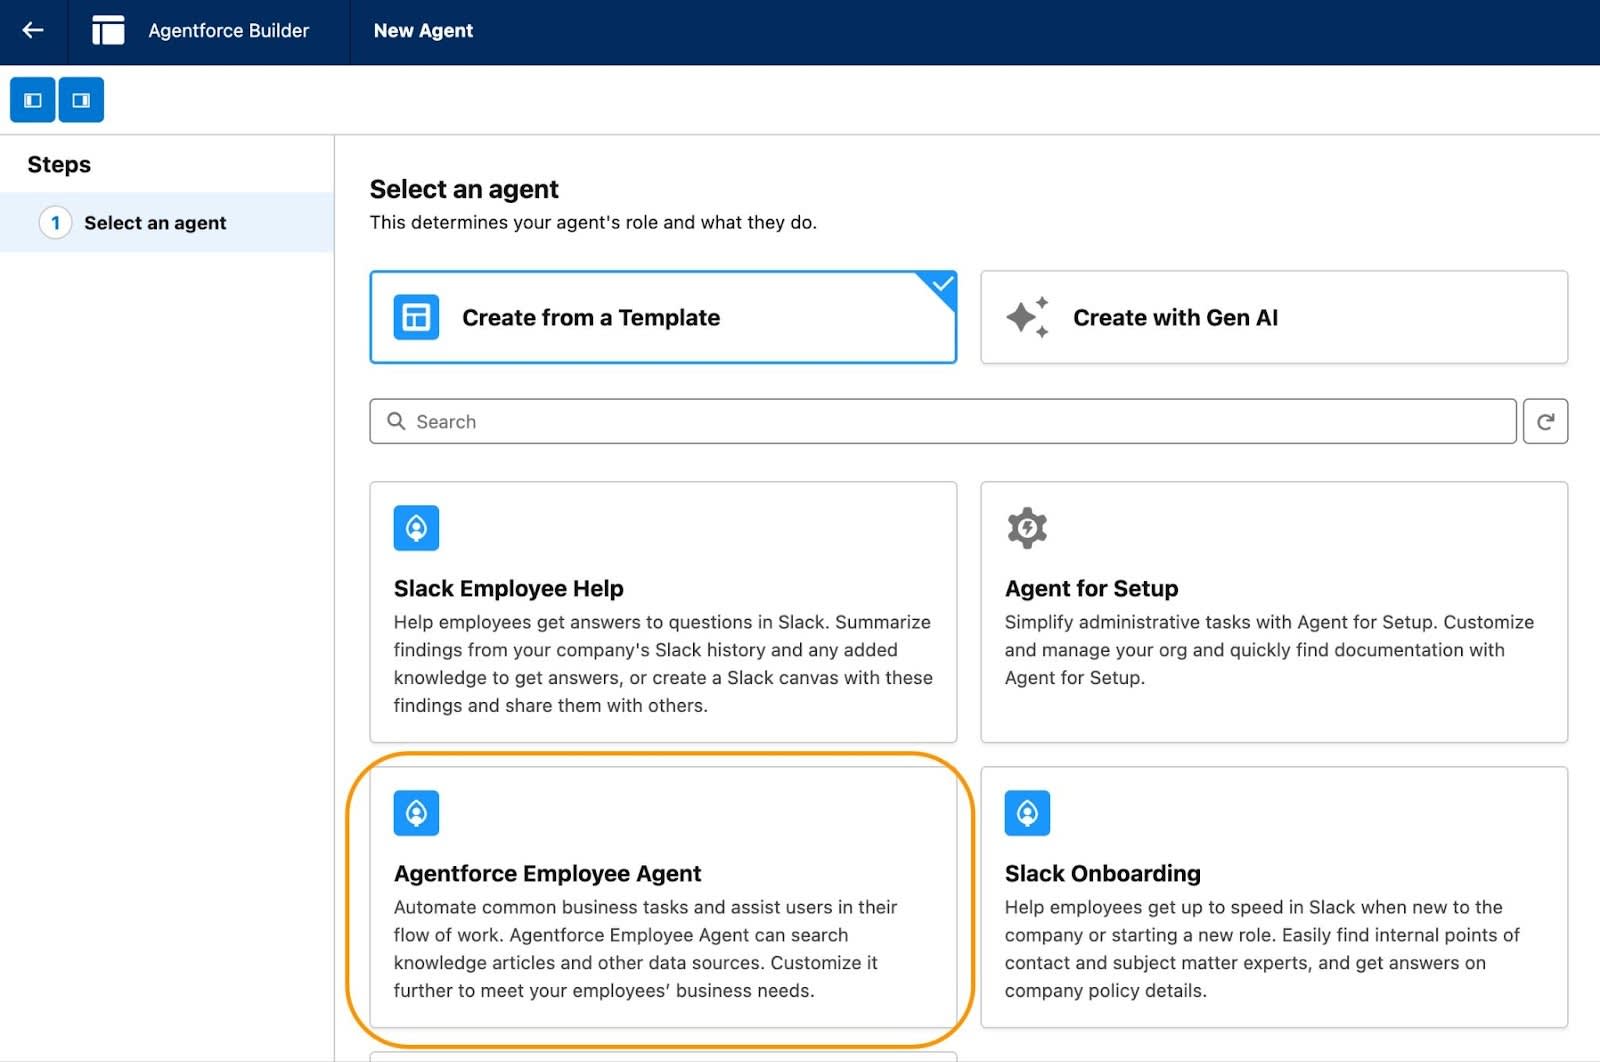
Reference image: Salesforce Agentforce Builder – New Agent selection screen. The available creation options can differ by org and release.
5. Step 3 – Create Your First Agent
After clicking New Agent, we can describe the business requirement using natural language.
For our project, we want to create a Lead Management Agent.
Enter the following prompt
Create a Lead Management Agent for a Salesforce
training company.

The agent should help potential students who want
to learn Salesforce Admin, Development and AI.

It should perform the following tasks:

1. Understand customer requirements.
2. Ask about Salesforce experience.
3. Qualify leads based on their requirements.
4. Collect first name, last name, email and phone.
5. Check for existing Leads before creating a new one.
6. Create a Salesforce Lead after customer confirmation.
7. Search existing Leads and provide enquiry status.

Create separate subagents for:

- Lead Qualification
- Lead Creation
- Lead Follow-up

Use Salesforce Flow or Apex actions wherever
business operations are required.

Do not create duplicate Leads.
Never create a Lead without user confirmation.
Click the Send icon or press Enter to submit the prompt.
The Authoring Agent can generate an initial configuration based on your description. If it asks follow-up questions, provide the required details.
Configure the Agent name
After the initial generation, review the configuration and enter the following details in the naming dialog.
| Field | Value |
|---|---|
| Agent Name | Lead Management Agent |
| API Name | Lead_Management_Agent |
| Agent User | Select an appropriate permitted user record |
Click Let's Go.
If you want to configure everything manually, select Skip Ahead when that option is available. This lets you start with an empty Agent configuration.
6. Step 4 – Understand the New Agentforce Builder Screen
After creating the Agent, you will enter the New Agentforce Builder workspace.
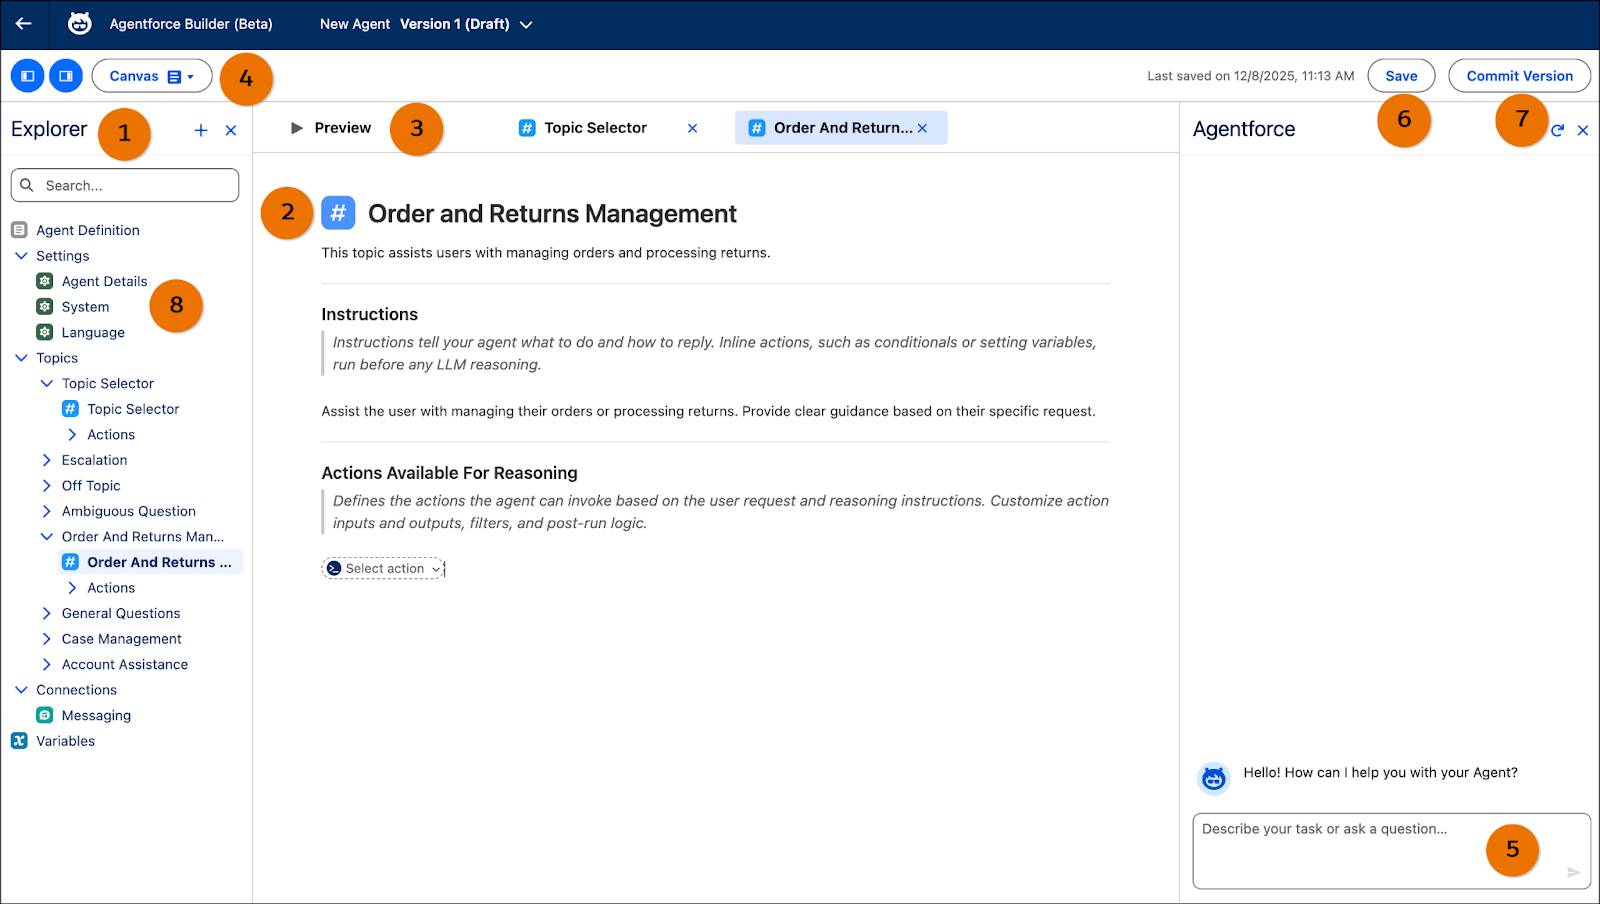
Salesforce Agentforce Builder interface reference. The screen layout and labels may differ between releases.
Let's understand the major areas.
| Area | Purpose |
|---|---|
| Explorer | Navigate Agent settings, Subagents, Actions, Variables, Connections and Data. |
| Canvas | Configure the Agent using a visual, natural-language-oriented editor. |
| Script | Write and edit Agent Script for more programmatic control. |
| Preview | Test the Agent using simulated conversations or supported live tests. |
| Agentforce Assistant | Get help creating, modifying and debugging the Agent. |
| Save | Save the current draft. |
| Commit Version | Create a version snapshot that can be activated. |
| Console | Review configuration errors and warnings. |
7. Step 5 – Configure Agent-Level Instructions
Agent-level Instructions define the overall behaviour of the Agent.
Open the System section and review the available system message and instruction settings. Add the following instructions in the appropriate Agent-level instruction field.
You are a professional Lead Management Assistant
for a Salesforce training company.

Your responsibility is to help potential students
with course enquiries and registrations.

Always:

1. Understand the customer's requirement.
2. Ask one question at a time.
3. Collect only required information.
4. Check existing Leads before creating a new one.
5. Ask for confirmation before creating a Lead.
6. Never create duplicate Leads.
7. Provide clear and friendly responses.

Do not assume missing customer information.
Do not expose internal Salesforce data.
Never claim that a Lead was created unless
the Salesforce action succeeds.
Configure the welcome message
In the appropriate System or message configuration, set a welcome message such as:
Hello! Welcome to Salesforce Training.

I am your AI Training Assistant.

I can help you with Salesforce Admin,
Development, AI courses and registration.

How can I help you today?
Click Save.
8. Step 6 – Create Your First Subagent
Now we will create three Subagents.
Each Subagent will be responsible for one business function.
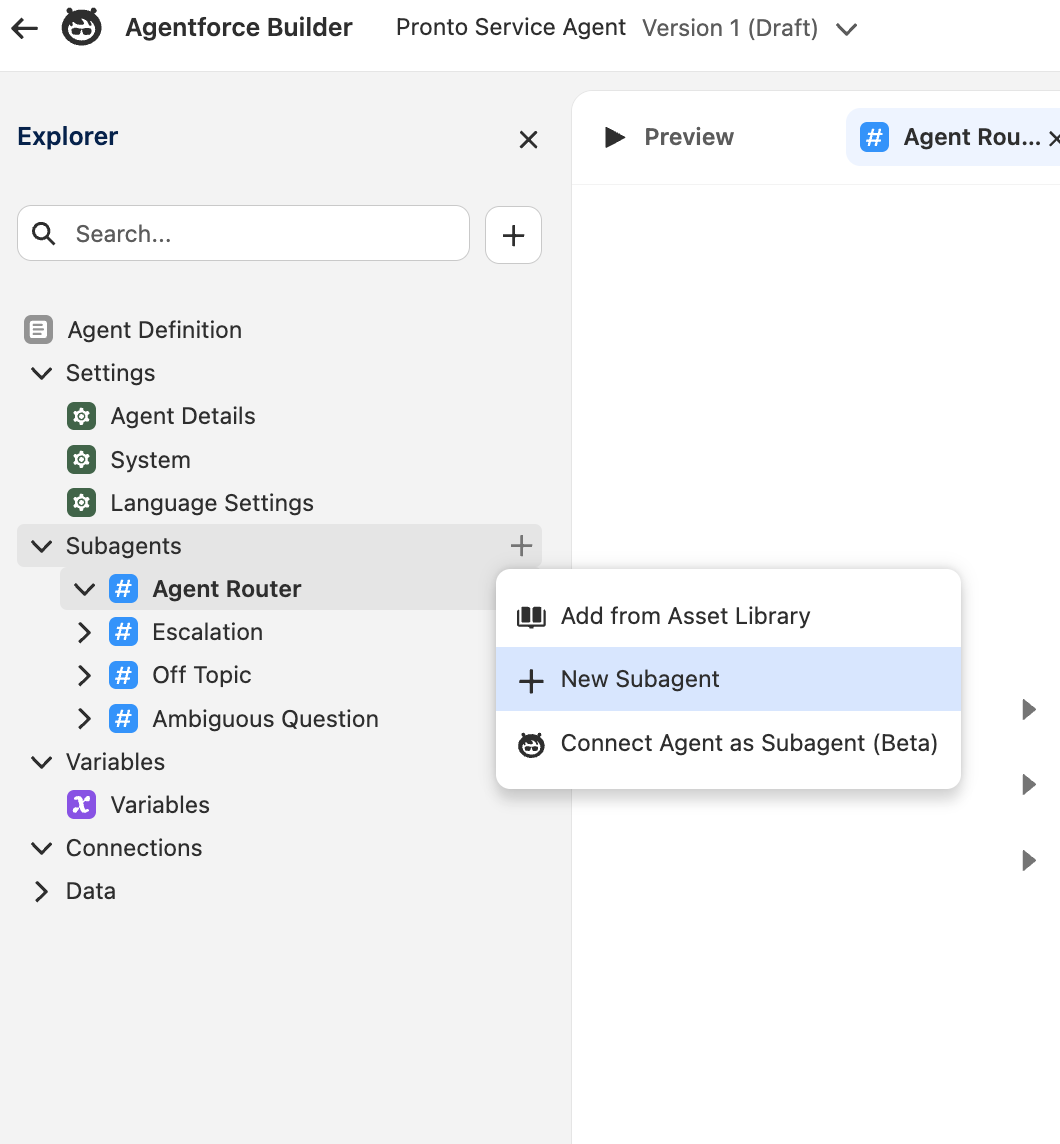
Reference image: Explorer panel with the Subagents section and New Subagent option.
Follow these steps:
- Open Explorer on the left side.
- Locate Subagents.
- Move your mouse over the Subagents section.
- Click the plus (+) icon.
- Select Create new subagent.
- Enter the Subagent name and description.
- Complete the configuration and save.
Subagent 1 – Lead Qualification
| Configuration | Value |
|---|---|
| Name | Lead Qualification |
| API Name | Lead_Qualification |
| Responsibility | Understand and qualify customer enquiries. |
Use the following description and instructions:
Help potential students understand Salesforce
training courses and identify their learning needs.

Collect information about:

- Previous Salesforce experience
- Interested course
- Current job role
- Learning objectives

Determine whether the customer is a beginner,
experienced professional or job seeker.

Do not create Salesforce records.
Click Save.
Subagent 2 – Lead Creation
| Configuration | Value |
|---|---|
| Name | Lead Creation |
| API Name | Lead_Creation |
| Responsibility | Create qualified customer Leads. |
Instructions:
Create Salesforce Lead records for customers
interested in training.

Collect:

- First Name
- Last Name
- Email
- Phone
- Interested Course

Before creating a Lead:

1. Validate mandatory information.
2. Check for an existing Lead using email.
3. If a matching Lead exists, do not create another.
4. Ask the customer for confirmation.
5. Execute the Lead Creation action.
6. Return the created Lead details.

Never create a record without confirmation.
Save the Subagent.
Subagent 3 – Lead Follow-up
| Configuration | Value |
|---|---|
| Name | Lead Follow-up |
| API Name | Lead_Follow_Up |
| Responsibility | Find existing Leads and return enquiry status. |
Instructions:
Help customers check their existing training enquiries.

Ask for the registered email address.

Search Salesforce Leads using the email address.

Return only permitted information:

- Lead Status
- Interested Course
- Created Date

If no Lead is found, explain that no matching
enquiry was found.

Do not expose sensitive Salesforce information.
Save the Subagent.
9. Step 7 – Create the Check Existing Lead Flow
Now we need to create the Salesforce automation that the Agent can invoke.
We will use an Autolaunched Flow to check whether a Lead already exists.
Click Create.
Configure Flow details
Set the Flow Label:
Check Existing LeadThe API Name can be:
Check_Existing_LeadCreate Flow variables
Open the Manager tab in Flow Builder.
Create the following variables one by one.
| API Name | Data Type | Input | Output |
|---|---|---|---|
| inputEmail | Text | Yes | No |
| leadFound | Boolean | No | Yes |
| existingLeadId | Text | No | Yes |
| existingLeadName | Text | No | Yes |
For inputEmail, select Available for input.
For the output variables, select Available for output.
Configure the Flow canvas
We need three main elements:
- Get Records – Search for the Lead.
- Decision – Check whether a Lead was found.
- Assignment – Set output values.
Element 1 – Get Records
Click the plus icon below Start and select Get Records.
| Setting | Value |
|---|---|
| Label | Get Existing Lead |
| Object | Lead |
| Condition Field | |
| Operator | Equals |
| Value | {!inputEmail} |
| How Many Records | Only the first record |
Store the fields needed for the response, including Id, FirstName and LastName.
Save the element.
Element 2 – Decision
Click the plus icon after Get Existing Lead.
Select Decision.
Label: Lead Found?
Create two outcomes:
Outcome 1: Existing Lead Found
Get_Existing_Lead.Id Is Null = FalseOutcome 2: No Existing Lead
Use the default outcome for the no-record-found path.
Element 3 – Assignment
On the Existing Lead Found path, add an Assignment element.
| Variable | Value |
|---|---|
| leadFound | True |
| existingLeadId | Get Existing Lead → Id |
| existingLeadName | Get Existing Lead → Name |
On the No Existing Lead path, add an Assignment element.
leadFound = FalseConnect both paths to End.
10. Step 8 – Create the Create New Lead Flow
Now we will create the Flow that actually inserts a Lead record.
Flow Label:
Create New LeadCreate input variables
| Variable | Type | Available for Input |
|---|---|---|
| firstName | Text | Yes |
| lastName | Text | Yes |
| Text | Yes | |
| phone | Text | Yes |
| interestedCourse | Text | Yes |
Create output variables
| Variable | Type | Available for Output |
|---|---|---|
| createdLeadId | Text | Yes |
| success | Boolean | Yes |
| message | Text | Yes |
Flow logic
We will create the following elements:
- Get Records – Find an existing Lead using email.
- Decision – Check whether the Lead already exists.
- Assignment – Return duplicate message if found.
- Create Records – Create a new Lead if no duplicate exists.
- Assignment – Populate success and created Lead ID.
Element 1 – Get Records
Object: Lead
Condition:
Email Equals {!email}Store the first matching record.
Element 2 – Decision
Label: Check Duplicate Lead
Outcome: Duplicate Found
Get_Existing_Lead.Id Is Null = FalseDefault Outcome: No Duplicate.
Element 3 – Existing Lead Assignment
If a duplicate exists, assign:
success = False
message = "A Lead with this email already exists."
createdLeadId = Get_Existing_Lead.Id
Connect this path to End.
Element 4 – Create Records
On the No Duplicate path, add Create Records.
| Setting | Value |
|---|---|
| Label | Create Training Lead |
| How Many Records | One |
| Object | Lead |
Configure the fields:
| Lead Field | Value |
|---|---|
| FirstName | {!firstName} |
| LastName | {!lastName} |
| {!email} | |
| Phone | {!phone} |
| Company | Individual - Training Enquiry |
| Status | New |
| Description | Interested Course: {!interestedCourse} |
For Company, use a valid value according to your org's configuration and business rules.
Store the created record ID using a record variable or the available created-record ID output from the Create Records element.
Element 5 – Assignment
After Create Records, assign:
createdLeadId = Created Lead Record ID
success = True
message = "Lead created successfully."
Connect the element to End.
Save the Flow and click Activate.

Reference image: Salesforce Flow Builder showing Get Records, Decision and Create Records elements. Your Lead Flow will use the same basic building blocks.
11. Step 9 – Create the Search Lead Status Flow
We need another Flow for the Lead Follow-up Subagent.
Flow Label:
Search Lead StatusCreate an input variable:
| Variable | Type | Input |
|---|---|---|
| inputEmail | Text | Yes |
Create output variables for:
- leadFound – Boolean
- leadStatus – Text
- interestedCourse – Text
- createdDate – Text
Configure the Flow:
- Add Get Records.
- Select the Lead object.
- Set Email Equals {!inputEmail}.
- Store the first matching record.
- Add a Decision element.
- If a record exists, assign the permitted output fields.
- If no record exists, return leadFound = False.
- Connect the paths to End.
Save and activate the Flow.
12. Step 10 – Create Agent Actions from Salesforce Flows
Now we have completed our Salesforce automation. The next step is to expose these Flows as Agent Actions.
Hover over Actions and click the plus (+) icon.
Select Create New Action.
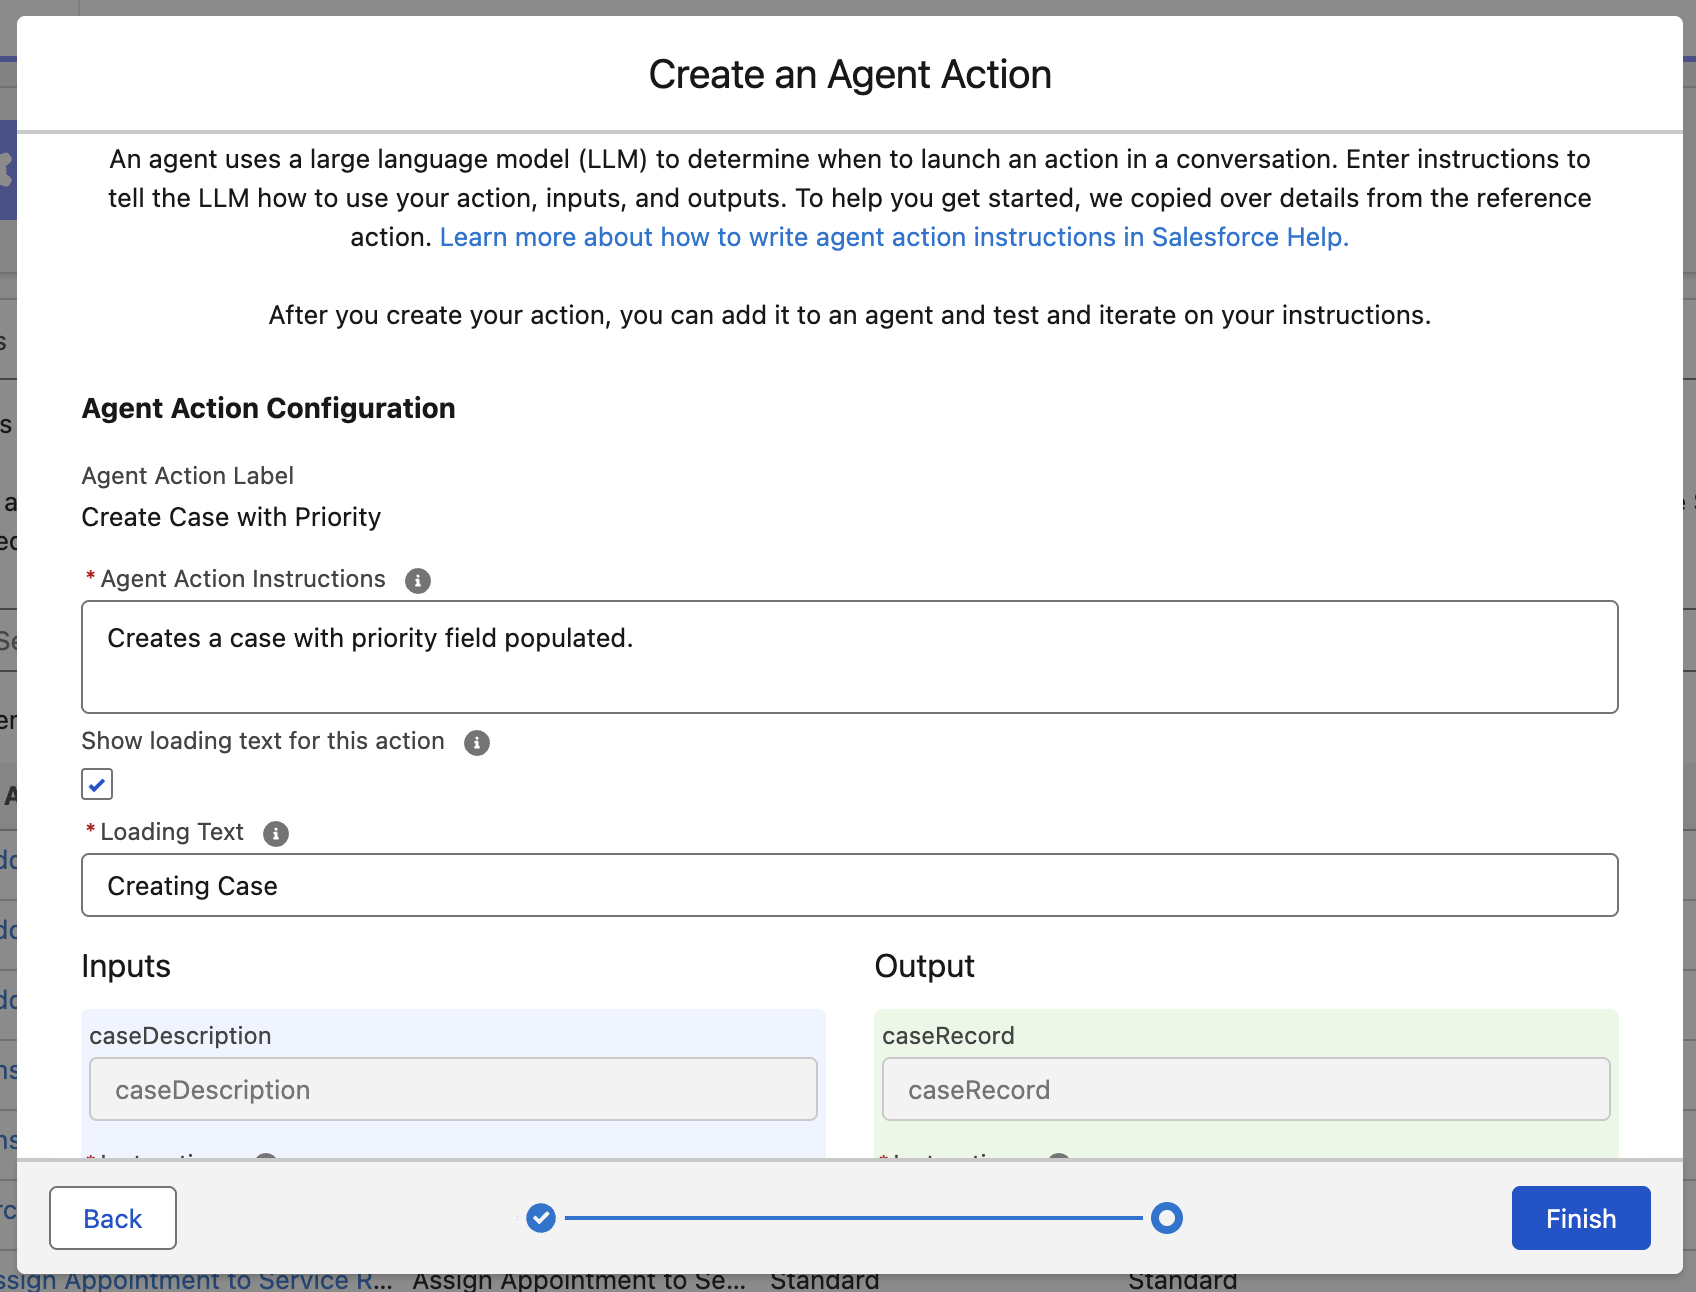
Reference image: Salesforce Agent Action configuration interface. The exact fields depend on the selected reference action type.
Action 1 – Create Training Lead
Enter the Action name:
Create Training LeadClick Create and Open.
Configure the Action:
| Setting | Value |
|---|---|
| Action Name | Create Training Lead |
| Description | Creates a Salesforce Lead after customer confirmation. |
| Reference Action Type | Flow |
| Reference Action | Create New Lead |
Review the generated input and output parameters.
Map the inputs:
| Flow Input | Purpose |
|---|---|
| firstName | Customer first name |
| lastName | Customer last name |
| Customer email address | |
| phone | Customer phone number |
| interestedCourse | Course selected by customer |
Configure the outputs:
| Flow Output | Purpose |
|---|---|
| createdLeadId | New Lead record ID |
| success | Indicates whether creation succeeded |
| message | Result message |
Review the Action instructions and make it clear that the Action should execute only after the customer has confirmed registration and the duplicate check has passed.
Click Save.
Action 2 – Check Existing Lead
Navigate back to:
Explorer → Lead Creation → Actions → + → Create New ActionConfigure:
| Setting | Value |
|---|---|
| Action Name | Check Existing Lead |
| Description | Checks whether a Lead exists using the email address. |
| Reference Action Type | Flow |
| Reference Action | Check Existing Lead |
Map inputEmail as an input parameter.
Map the outputs:
- leadFound
- existingLeadId
- existingLeadName
Save the Action.
Action 3 – Search Lead Status
Now open the Lead Follow-up Subagent.
Explorer → Subagents → Lead Follow-up → Actions → +Select Create New Action.
| Setting | Value |
|---|---|
| Action Name | Search Lead Status |
| Reference Action Type | Flow |
| Reference Action | Search Lead Status |
Map the input email and the output values such as Lead Status, Course and Created Date.
Save the Action.
13. Step 11 – Configure the Agent Router
Now comes an important part of the Agentforce architecture.
The Agent Router is responsible for determining which Subagent should handle the user's request.
In the new builder, the Agent Router is a core routing component. It may already be present in the generated Agent configuration.
Review its instructions and routing behaviour.
| Customer request | Route to Subagent |
|---|---|
| I want to learn Salesforce. | Lead Qualification |
| Tell me about Salesforce Development. | Lead Qualification |
| I want to register. | Lead Creation |
| Create my training enquiry. | Lead Creation |
| Check my registration status. | Lead Follow-up |
| I already registered. | Lead Follow-up |
Agent Router instructions
If the user wants to know about Salesforce courses,
training or learning paths, transition to
Lead Qualification.

If the user wants to register or submit their details,
transition to Lead Creation.

If the user wants to check an existing enquiry,
transition to Lead Follow-up.

If the request is unclear, ask a clarifying question.

Never create Salesforce records directly from
the Agent Router.
Save the Agent configuration.
14. Step 12 – Test Your Agent Using Preview
Before activating the Agent, we need to test the complete implementation.

Reference image: Agentforce Preview panel with conversation and Interaction Details.
The Preview area allows us to test the Agent and inspect how it processes requests.
Test Case 1 – Course Enquiry
Enter this message:
I want to learn Salesforce Development.Expected response:
Great! Do you already have experience with
Salesforce Admin, or are you completely new
to Salesforce?
Expected routing:
Lead Management Agent
        ↓
Agent Router
        ↓
Lead Qualification
No Salesforce Lead should be created during this conversation.
Test Case 2 – Lead Registration
Enter:
Register me for Salesforce Development training.Expected response:
Sure! Please share your first name, last name,
email address and phone number.
Provide sample details:
First Name: Rahul
Last Name: Sharma
Email: rahul@example.com
Phone: 9876543210
Course: Salesforce Development
The Agent should review the information and ask for confirmation.
After confirmation, the expected execution is:
Agent Router
    ↓
Lead Creation Subagent
    ↓
Check Existing Lead Action
    ↓
Check Existing Lead Flow
    ↓
Decision: Duplicate Found?
    ↓
If No Duplicate
    ↓
Create Training Lead Action
    ↓
Create New Lead Flow
    ↓
Salesforce Lead Created
    ↓
Return Lead ID and Success Message
The final response should use the actual returned Lead ID and success output.
Test Case 3 – Existing Lead Status
Enter:
I already registered for Salesforce training.
Can you check my enquiry status?
Expected behaviour:
- Agent Router selects Lead Follow-up.
- Subagent asks for the registered email.
- Search Lead Status Action executes.
- Flow searches Salesforce Lead records.
- The Agent returns the permitted Lead Status.
15. Step 13 – Debug Agentforce Interactions
Testing is not complete until we understand what happened behind the scenes.
After running a test conversation, open Interaction Details.
Inspect the following:
- Routing: Which Subagent was selected?
- Reasoning: Why did the Agent choose that Subagent?
- Action: Which Flow Action was executed?
- Inputs: Were all values passed correctly?
- Outputs: Did Salesforce return the expected results?
- Variables: Did the values change as expected?
New Agentforce Builder Preview supports simulation and live testing. Simulate mode is useful for checking behaviour without executing real operations or changing org data. Live Test executes supported actions in the org, so use test data and suitable permissions.
16. Step 14 – Commit and Activate Your Agent
Once all tests are successful, prepare the Agent for activation.
Follow these steps:
- Click Save to save your draft.
- Review the Console for configuration errors and warnings.
- Check the Agent Router and all Subagents.
- Verify every Action and its input/output mapping.
- Check Agent User permissions.
- Click Commit Version to create the version snapshot.
- Activate the committed version using the available activation control.
- Configure the supported deployment channel for the selected Agent type.
After activation, test the Agent in its intended user experience.
17. Understanding the Complete Agentforce Execution
Let's look at the complete business flow from the developer's perspective.
The important point is that the Agent handles natural language and task orchestration, while Flow performs the defined Salesforce business operations.
18. Advanced Developer Concept – Agent Script
Once you are comfortable with Canvas view, the next step is to explore Agent Script.
Agent Script is a language used to define Agent behaviour with programmatic expressions, conditional logic, variables, transitions and Action orchestration.
Agent Script is particularly useful when you need predictable execution instead of relying only on natural-language interpretation.
For example, the business rule is that Lead Creation must happen only after customer confirmation.
Conceptually, the logic would look like this:
IF customerConfirmed = TRUE
    Continue to Lead Creation
ELSE
    Ask customer for confirmation
END IF
This is conceptual pseudocode, not valid deployable Agent Script syntax. Use the official Agent Script Developer Guide for the supported syntax and resource references.
Official reference: Agent Script Developer Guide.
19. Common Errors and Troubleshooting
| Problem | Possible solution |
|---|---|
| Agentforce Studio not visible | Check org entitlement and user permissions. |
| New Agent button missing | Verify Agentforce enablement and Manage AI Agents permission. |
| Wrong Subagent selected | Improve routing descriptions and instructions. |
| Action not executed | Check that the Action is assigned to the correct Subagent. |
| Flow inputs missing | Review variable input settings and Action mappings. |
| Lead not created | Check required fields, Flow errors and Agent User permissions. |
| Duplicate Lead created | Implement stronger duplicate prevention and test concurrent requests. |
| Incorrect success message | Make the response conditional on the actual Flow output. |
| Agent cannot access Lead | Review object permissions, field permissions and record access. |
20. Interview Questions – New Agentforce Builder
Q1. What is Agentforce?
Agentforce is Salesforce's platform for building AI-powered agents that understand requests and perform business tasks using instructions, Actions and Salesforce data.
Q2. What is a Subagent?
A Subagent is a specialist component responsible for handling a specific business responsibility within an Agent.
Q3. What is Agent Router?
Agent Router determines which Subagent should handle the user's request based on intent and conversation context.
Q4. What is an Agent Action?
An Agent Action allows an Agent to execute an operation using supported capabilities such as Salesforce Flow or Apex.
Q5. Can we use Apex with Agentforce?
Yes. Supported Apex methods can be exposed as Agent Actions for custom business logic and Salesforce operations.
Q6. What is Agent Script?
Agent Script is a language for controlling Agent behaviour using variables, expressions, conditional logic, transitions and Action orchestration.
Q7. What is the difference between Canvas and Script view?
Canvas provides a visual, natural-language-oriented way to configure an Agent, while Script view provides direct access to the underlying Agent Script.
Q8. How do you prevent duplicate Lead creation?
Use Matching Rules, Duplicate Rules, unique identifiers and suitable Apex-based duplicate handling. A simple Get Records check alone is not sufficient for concurrency safety.
Q9. What is the purpose of Agent-level Instructions?
They establish the overall behaviour and boundaries of an Agent.
Q10. How do you debug Agentforce?
Use Preview, Interaction Details and trace information to inspect routing, Subagent execution, Action inputs, outputs and variable changes.
21. Further Enhancements for This Project
Once the basic implementation is working, we can extend the Agent with more advanced capabilities.
- Lead Assignment: Automatically assign Leads based on the selected course.
- Email Notifications: Send an acknowledgement after successful registration.
- Appointment Booking: Allow students to schedule counselling sessions.
- Salesforce Knowledge: Answer questions using course information, fees and training schedules.
- Apex Integration: Implement advanced duplicate detection and custom validation.
- Analytics: Track Agent usage, registration success and failed interactions.
- External Integration: Connect external systems using supported integration capabilities.
22. Official Salesforce Learning Resources
For further learning, refer to these official resources:
- Access Agentforce Studio and the New Builder
- Create an Agent
- Create a Custom Subagent
- Create a Custom Agent Action
- Agent Script Developer Guide
- Salesforce Developer Agentforce Workshop
- Explore the New Agentforce Builder – Trailhead
Conclusion
Agentforce is changing how we approach Salesforce development. Instead of building only traditional automation, we can now create AI-powered agents that understand customer requests, select the right business capabilities and execute Salesforce operations.
In this tutorial, we created a Lead Management Agent using the New Agentforce Builder. We configured Agent-level Instructions, created specialist Subagents, built Autolaunched Flows, exposed those Flows as Agent Actions and tested the complete registration process.
One important thing to remember: successful Agentforce development is not just about writing prompts. It requires proper architecture, reliable Actions, clear instructions, secure data access and thorough testing.
Start with a simple business use case, understand the execution flow and gradually move towards advanced Agent Script and Apex-based implementations.
